Google Adsense is the first major contextual advertising network.
Its considered one of the best and legitimate ways to monetize a blog if done in the right way.
Google Adsense places content targeted ads on your site, sells those ads to appropriate advertisers, monitors visitor click-throughs, tracks how much money is owed, and then pays you what you’ve earned.
To earn money via Adsense advertising on your blog you need to sign up for Google Adsense first.
The good news is that Google has made it faster and easier to apply for AdSense and get your account approved. Now when you sign up, you’ll have instant access to your AdSense account.
How to Sign-Up for the New Google Adsense Account
Before we proceed with the sign-up process, let me remind you that there are some rules set forth by Google about what kind of content is acceptable for Adsense.
You are supposed to read, understand and follow these rules before you partner with Google Adsense.
When you’re ready with the appropriate content you can submit your application for Adsense approval.
Signing up for Google Adsense is easy enough to do, and completely free. Here is the process for Adsense Sign-Up.
Part 1: Filling & Submitting Your Application Form:
Step 1: You start at the main Adsense page
Step 2: Press the “Sign Up Now” button to start.
Step 3: You can choose between an existing Google account or create or use another account.If you have a professional email address ( i.e domain specific), use it to create the Adsense account.

Hot Tip: The chances of getting approval with a domain-specific email address are high when compared to a generic email address.
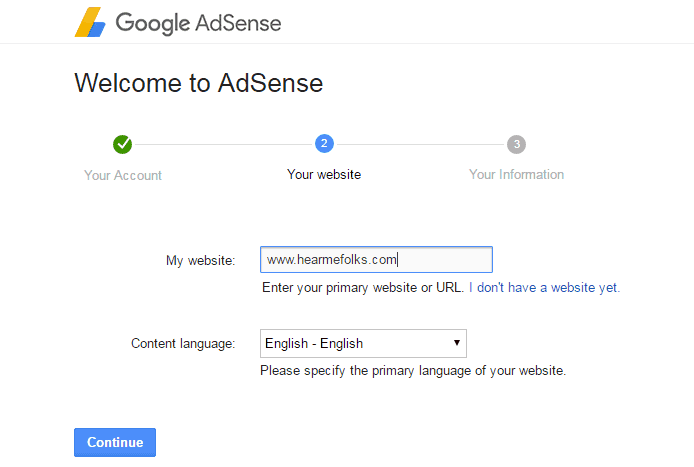
Step 4: Enter the URL and chose the primary language of your website.
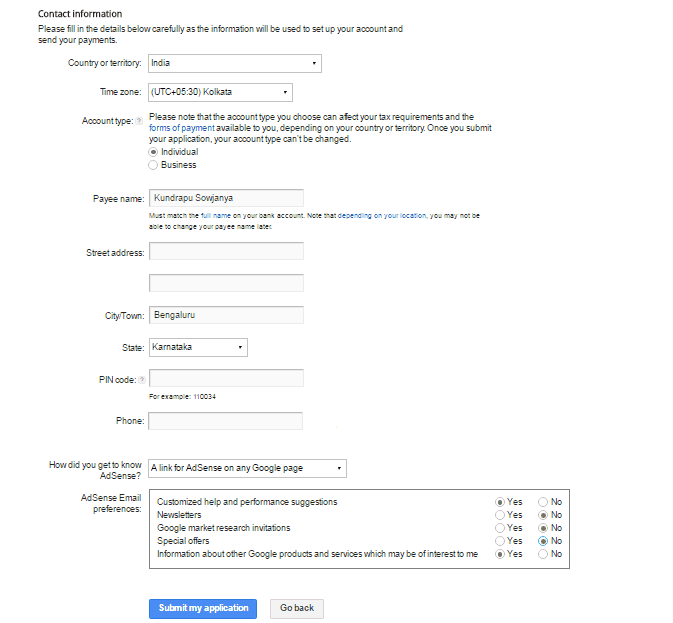
Step 5: The next step is to enter your contact information. You need to be careful with the details you enter as the information will be used to set up your account and send your payments.
Select the account type as “Individual” if you are an independent blogger.
Note: Payee Name must match the full name on your bank account. Depending on your location, you may not be able to change your payee name and the account type later. So be cautious while filling the details.
Part 2: Preparing the Site for Review
Part 3: The Real Testing Period is the Review Period
Once you’re done with the first two parts, it’s time to let Google review your application.
After you’ve placed the ad code on your sign-up URL, Google automatically continues the review process and checks that your site complies with their policies.
The review period is typically one to two days, once your application is reviewed Google will notify you of their acceptance.
You’ll receive an email letting you know the status of your application.
Part 4: Your Application Status
If your application is approved then your Adsense account is now fully activated. The red bar across the top of your account is gone and within a few hours, you’ll begin to see live ads.
If your application is not approved at this stage, you’ll receive an email explaining the disapproval reason and the possible next steps that you can take.
Once your application is approved for the AdSense program, insert a few lines of code into your web page underlying HTML code, and then sit back and let Google do the rest of the work.
I hope this article will help you to successfully create an Adsense account.
Have any questions regarding the AdSense account creation? If you have anything to suggest or ask feel free to act accordingly in the comments section!

Howdy Folks, thanks for stopping by my blog.
I’m Swati, a proud mom, dedicated side hustler, full-time blogger, and a recognized millennial work-at-home expert. My expertise has been featured on esteemed platforms such as Forbes, CEO Blog Nation, Referral Rock, Vital Dollar, Databox blog, and many more. I have embarked on this incredible journey to share my firsthand experiences in the world of online income generation and to assist all of you in earning money from the comfort of your homes.
Join me in my mission to revolutionize the way we make money and achieve financial freedom. Trust me, it’s not as challenging as it may seem!
Together, let’s explore the boundless opportunities and pave our paths towards a prosperous future.


lydaketner3430
Sunday 17th of February 2019
Thanks for any other informative site. Where else may I get that kind of info written in such an ideal manner? I've a mission that I am just now working on, and I have been on the glance out for such information.
How to Create Adsense Ad Unit to Increase CTR? | HearMeFolks
Tuesday 25th of April 2017
[…] Related Resource: The New Google Adsense Account Sign-Up Process […]
What is AdSense Revenue Share to Publishers? | HearMeFolks
Tuesday 25th of April 2017
[…] Also Read: The New Google Adsense Account Sign Up Process […]
Quick Guide: How To Add Adsense Code To WordPress | HearMeFolks
Tuesday 25th of April 2017
[…] the sign-up process for Adsense account, you will be asked to add Adsense code on your website for account review. However, you’ll only […]
Adsense Account Disapproved! How to Proceed Now? | HearMeFolks
Tuesday 25th of April 2017
[…] The New Google Adsense Account Sign Up Process […]