Whether you are searching for how to take feet pics as a creative way of expanding your photographic horizons or simply wanting to sell feet pictures and make money, this post is for you.
Want to know a secret? You can actually get paid to take pictures of your feet. But, taking best-selling feet pictures isn’t an easy task.
No pressure though, but to be profitable, you need to know how to take professional-looking photos that stand out from the rest.
Ask yourself, as a consumer, would you be willing to buy ugly-looking photos? It’s a BIG NO, right?!
So, how to take feet pics to sell for money, let’s get to work and start by breaking down the tasks into a series of simple steps.
How to Take Feet Pics [Key Takeaways]

This will give you a good idea of all the preparation that you need to accomplish.
- Care for Your Feet
- Conceptualize the theme for your Feet Photoshoot
- Take Inspiration from Best-Selling Feet Picture Ideas
- Invest In Proper Feet Photography Gear
- Scout for the Best Location for Feet Photoshoot
- Pay Attention to the Background of Your Feet
- Let there be Ample lighting on your Feet
- Add Props for Eye-Catchy Feet Pics
- Experiment with Angles
- Finally, Shoot & Edit Your Feet Pics
Invest In Proper Photography Gear
In the current digital era, we can all agree that it is image quality that drives sales. Further, you risk losing opportunities if your feet’ photos appear blurry.
The best way for capturing great foot shots these days is to invest in the right equipment; a good camera, a steady tripod, and effective lighting gear.
Below are the considerations that go into selecting photography gear for taking feet pics.
NOTE: If you are satisfied with the quality of your smartphone pics, you don’t need an expensive digital camera, pairing your mobile with an adjustable stand and rotatable ring light can help you achieve spectacular results!
a) Best Camera to Take Feet Pictures
The best camera for photography isn’t necessarily the most expensive, or the most powerful – it’s about choosing the right camera for what you want to do.

Panasonic LUMIX FZ80 is one of the best point-and-shoot cameras designed to offer incredible photo and video capturing performance even under low light.
Moreover, it’s our top pick for taking stunning feet photography in an affordable range.
b) Tripod Stand and Lighting Gear

Even after investing in a good camera with many sophisticated features, a tripod stand is still a necessity.
The reason is that if your camera is not stable, you could end up with too blurry pixelated photos, which is a major concern.
Furthermore, the best feet pics can only be achieved with optimal lighting.
For this, be sure to check out this awesome ring light with a camera holder perfect for taking feet pics.
📸 Interested in buying a lightweight all-in-one feet photography kit in one place?
Here’s my top pick:
The Canon PowerShot G7 X Mark III+ Accessory Bundle (comes with a 1-year seller warranty).
So, now that you have the necessary photography gear, let’s move on to the meat of the article.
Best Feet Poses: Feet Pics Ideas

Looking for the best feet picture poses to sell? Well, there is no limit to the number of poses that you can create using your feet, legs, and toes.
To get you started, here are some tried and tested feet picture ideas for best-selling feet picture poses:
1. Feet Sole Poses
This pose captures the bottom of your feet, from the heel to the toes. You can pose while sleeping on your back or on your stomach.


2. Feet Up In the Air Pose
This is among the best feet picture poses on photo-selling sites.
As the name suggests, just lift both your feet in the air and take a snap. Experiment with feet apart, toes touching, feet crossed, heels on, and so on.
This pose is best when you have a friend to take it for you. You can also nail the pose using a selfie stick.


3. Pedicure & Nailpolish Poses
Experiment with painted nails. Add beauty to your feet by adding hands into the frame. You can have fingers and toes intertwined or painted differently in varying backgrounds for improved aesthetics.


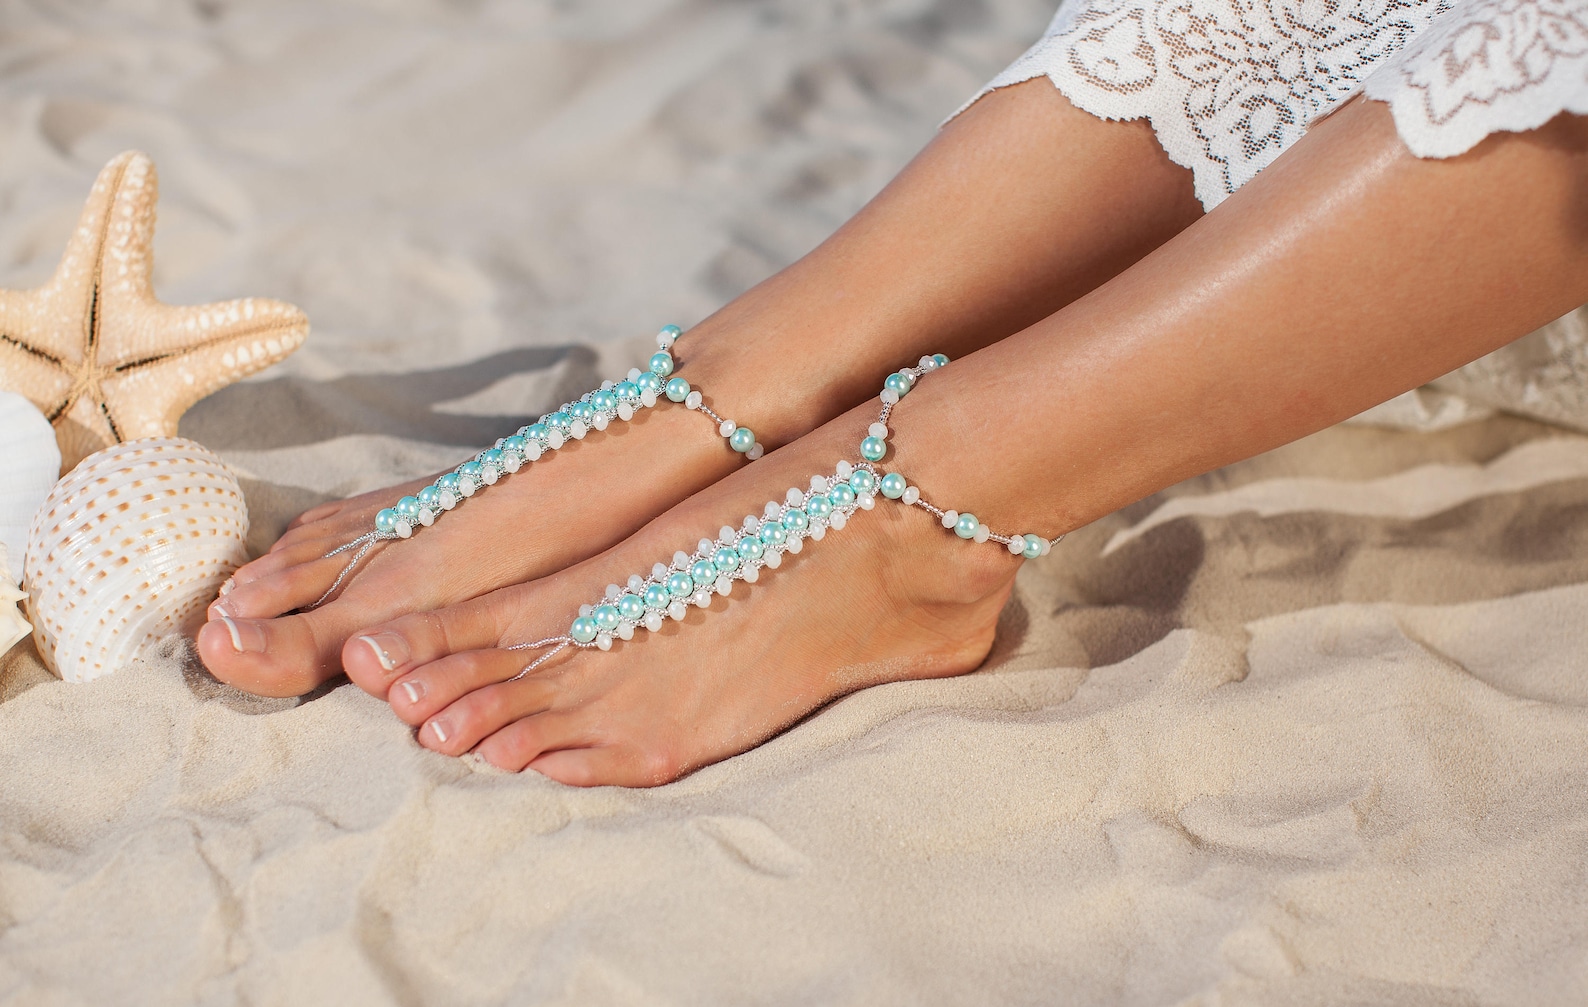
4. Accessorized Feet Pose
Feet pictures look more adorable with foot jewelry and other accessories. And I’m not just talking about anklets, be creative. How about some LED lights wrapped around your feet, temp glowing tattoos, or crochet and beaded sandals?
5. Giant Feet
This is an excellent way to showcase your feet in a portrait, and it works particularly well irrespective of your feet size.
When the feet are facing directly toward the camera it will look bulky and can attract too much attention. Anything that’s closer to the camera will look bigger.
Actually, you don’t need them to be giant; they just need to look that way!!
Check out this Instagram post for inspiration!

How to Sell Feet Pics Like a Pro In 2024 [eBook]
Master the Art of Selling Feet Pics with Our Ultimate Guide on 'How to Sell Feet Pics Like a Pro!'
*Instant Digital Download – No Physical Item Shipped*
Ready to turn your creativity into cash? Get immediate access to our comprehensive 40-page ebook, "How to Sell Feet Pics Like a Pro!", with a one-click purchase!
What's Inside:
- A detailed, step-by-step guide to selling feet pictures online.
- Where to sell your pics (platforms that yield the best results).
- How to price your photos (Menu card to maximize your earnings)
- How to attract clients.
- How to grow your business
- How to take photos (top 10 poses that will make your photos stand out)
- How to avoid scammers
- How to respond to DMs
- How to receive Payments
- A thorough FAQ section, and so much more!
**Special Offer: Get this ultimate guide for just $17.00!
Enjoy a whopping 30% discount off the regular price of $25.
Don't miss this chance to earn like a pro. Whether you're looking for a lucrative side hustle or just curious about this unique niche, our guide provides all the tools you need to succeed.
**Questions? Need More Help?**
Feel free to reach out via this platform if your question wasn't covered in the ebook. >> Grab your copy now and start your journey to financial empowerment!
How to Have Pretty Feet?
Regardless of what you want to do with your feet in pictures, it’s important to take care of your feet before shooting. Needless to say, you don’t want your photos to show unattractive foot problems.
So, let’s look at some quick tips to keep your feet soft, moisturized, beautiful, and ready for the photoshoot:
Invest In Foot Spa
Foot care includes looking after your skin, soles, toenails, and everything in between, including leg hair.
Here’s a big idea if you can afford to; investing in personal foot spa treatment supplies will save you a lot of time and energy.
Try out the Gearmatte Professional Pedicure Kit that comes with an electric callus remover, foot file, plus extra pedicure products. With 3 sand grinding heads and varying coarseness, the kit is perfect for both hard cracked, and soft feet.
However, if you are on a tight budget, let’s look at how you can take good care of your feet at home with a minimal budget. Simple home remedies for soft & supple feet:

1. Inspect Your ToeNails
Thoroughly inspect your toenails for fungus and other infections.
This may necessitate removing nail polish using a mild remover. I say ‘mild’ because most of the removers in the market contain acetone, a chemical that causes toenails to thin with time.
Talking of polish, your nails are healthier if they are not painted all the time.
2. Exfoliate Your Feet
Spending on your feet every week is perhaps an expensive lifestyle. But what could be more important if you want to take great photos of your feet?
Use a gentle scrub such as the LOVE, LORI Extra Strength Gel to exfoliate your feet at least once a week.
This will not only prevent the formation of unsightly calluses and corns, but your feet will become smoother. The product works well with foot scrubbers for removing tough calluses without hurting your soles.
3. Trim Your Toenails
Nails with jagged edges can ruin photos and make a person’s hands look ugly. Shaping and filing your nails on a regular basis will make sure your nails stay healthy, trimming them will help avoid ingrown toenails.
A stainless steel nail nipper will help you trim your toenails.
4. Safeguard Your Feet from Direct Sunlight
When the sun isn’t out, you are probably safe from UV radiation. But long hours of exposure to direct sunlight on your feet can lead to nasty skin conditions. Don’t worry, there’s a simple solution for that.
Whenever you’re going out for a considerable period of time, always ensure that you apply sunscreen lotion on your feet.
My favorite lotion is the Neutrogena Ultra Sheer Sunscreen. Apart from 100+ SPF shielding, it’s water-resistant for those cool underwater shots.
5. Try Wax Treatment
A warm paraffin wax bath is known to open skin pores and soften your skin and feet soles. The heated wax also aids in blood flow for healthy skin. Overall, the treatment makes it easier for the skin to absorb topical treatments and moisture.
If you are into DIY, purchase a wax brick, melt it, and add it to your foot bath. You can also buy a paraffin wax kit that is ready to use.
6. Moisturize & Massage Your Feet Regularly
Let me say this straight, moisturizing will do wonders for your feet.
But you’re probably wondering how to go about it – make a routine of applying a thick moisturizer to your feet before bed. This will hydrate and soften your feet overnight.
When applying the moisturizer, take the time to massage your feet. The motions help in stretching tendons, and improve your blood circulation to the feet, ensuring that your feet arch painlessly when attempting difficult poses.
As the last step, wear socks to allow better absorption of the hydrating ingredients in your moisturizer. Your feet will thank you for it!
7. Don’t Forget to Soak
At the end of your photoshoot, your feet are bound to be achy and sensitive. What you need is to soak your feet in warm water for 15-20 minutes.
Add some therapeutic oils into the water for the complete spa-grade treatment. Soaking your feet also makes it easier to soften hard calluses.
Caution: Using hot water for the treatment will cause your skin to dry out and develop cracks. The reason is that as the hot water evaporates, it draws moisture from the body.
How to Take Good Feet Pics To Sell?

Here’s the most important part, how do you choose the right setting for your feet photoshoot?
If you are new to photography, choosing the right setting for your beautiful feet photo shoot can be a daunting task. There are a lot of important decisions to make on how to take good feet pictures.
The quality of your output depends on how you pick a concept, how you choose a location and the equipment you choose for your photoshoot.
Does that sound familiar? The good news is we’ve all been there, and are here to help. The steps below will also clarify your decision-making process.
Believe it or not, whether you’re a professional photographer or an amateur attempting your first photoshoot, these steps will help you to accomplish an effective feet photo shoot.
Step 1: Develop a Good Concept for Your Feet Photoshoot
The first step of conducting a feet photoshoot is coming up with a concept. Whether it’s an indoor or outdoor feet shoot, the concept should ideally determine all other logical and creative decisions.
Start with your goals and a theme for your feet photo shoot.
Ask yourself what or who you want to emulate, a feeling, an emotion, or a mood you want to evoke. Choose a style or a color; do you want your photos in black and white, or in color?
Step 2: Mind Your Location & Control the Lighting for Shooting Feet Photos
After collecting a number of good photos to use as your reference point, it’s time to choose a location. Let me say this straight, choosing where to conduct a professional feet photo shoot is not easy. It all boils down to the following questions:
- What is the best setting for your concept?
- Is the location going to cost you? If so, how much and is it going to affect your budget?
- Is natural lighting available? Do you need to use artificial lighting?
The best location is an area with plenty of light.
Already your feet are where shadows mostly hit meaning, if not well illuminated, the pics will capture shades. So, good lighting is especially vital when capturing feet pictures.
For this, all you have to do is to shoot photos of your feet in natural lighting. If not, you’ll have to invest in a good basic lighting setup.
If you are having an indoor shooting session, choose a room with large windows to use the natural light. You can also use artificial lighting such as well-positioned overhead lamps.
Step 3: Pay Attention to the Background
To shoot attractive photos showing your nice toes, avoid boring backgrounds. Busy backgrounds are out rightly are distracting. Make no mistake about it, a sandy beach or a grassy meadow is more visually appealing than a plain white wall.
Look for a background with a simple pattern to augment your beautiful feet. A soft sofa, fluffy rug, or light-colored wall will all make for good backgrounds.
Step 4: Add Props for Good Quality Photos
The key to using the props in your feet pictures is choosing a setting that works well with them. You need to know your props to understand how to take good feet pictures.
The various props you can use for your photoshoot include:
- Flowers
- Jewelry
- Feathers
- Vehicles
- Confetti
- Dirt and mud
- Furniture
- High Heels
- White or colored linen
- Ribbons
- Beach stones
- Tattoos
While flowers can increase the sophistication of your feet, feathers can create a whimsical appearance, making your feet look more ethereal. On the other hand, leaves depict a natural and rustic look while rugged rocks can add texture to your feet photos.
Now that you know what light works for you and which background best enhances your pics, here is how to go for money-worthy feet pics.
Step 5: Experiment with Angles and Feet Poses
A single shot from one angle is never sufficient.
Observe how professional photographers take pics focusing on long legs and feet, and try to mimic these angles.
Make a note of specific foot poses and angles that you want to capture. Try to capture shots from strange and varied angles. Repeat this relentlessly to perfect your shots and angles.
Step 6. Edit for Professional Looking Feet Pics
Once you’re done with the feet photoshoot session, it’s time to make edits and transform the images into more appealing feet photos.
Some of the best brands in the market are Adobe Lightroom and DXO Photolab. But, for beginners with a non-designer background, Canva is a great option that is extremely user-friendly.
Pro Tip: Remember to always back up your photos in an external storage device or in cloud-based repositories.
Step 7. Start Marketing Your Feet Pics
It’s time to start marketing your feet pics and make sales.
You can either choose to build a portfolio, create your own website, or sell them on foot-fetish platforms like Instafeet, FeetFinder, or Feeetify.
There’s no shortage of people willing to pay for attractive feet pictures.
So, without any further ado, check out these quick guides to selling feet pics on Instafeet, on FeetFinder, and On Feetify; without getting scammed.
How to Make Feet Pics Look Good [Pro Tips]
Cameras and other photography kits may not be of much help in the hands of an inexperienced photographer.
It can be particularly frustrating when all your photos turn out boring, colorless, and out-of-focus. Lack of quality in your photos can lead to instant rejection.
The good news is you can learn how to take feet photos like a pro but prior to that, you should learn to take care of your feet. To get the right shots that showcase your feet’s beauty and uniqueness, here are some important pointers:
1. Frame Your Photo
Generally, a good photo should adhere to the rule of thirds. As a guide, the rule helps you place your subject, in our case your feet, at a vantage point.
2. Be Unique
This is where creativity comes in. Tap in your mind for distinctive feet poses that can be your signature.
3. Mind the Head Room
Headroom refers to the distance to the relative vertical distance of a pic’s subject in relation to the frame.
In the case of feet pics, this is the distance between the topmost part of the leg that you are willing to expose and the top edge of the frame.
Professional photographers advise that the headroom should not be too much to avoid your feet looking like miniatures.
4. Avoid Using Digital Zoom
First off, high-end cameras come with optical zoom as opposed to the digital zoom feature common in smartphones.
The former refers to zooming through relative movement of lenses while the latter is basically magnifying an image, resulting in pixelated and unnatural photos.
So, when using a smartphone, mimic a pro camera by moving your feet closer for close-up shots.
5. Choose the Right Aperture Exposure
The opening of a camera’s lens is known as the aperture. When it is wide open, more light enters the image processing unit, isolating your feet in relation to your surroundings.
On the other hand, a narrow aperture limits the light, allowing you to focus on a larger area, such as your feet against a pristine background.
6. Take Many Pics
Getting the right pose, background, and picture angle is not easy.
The time spent to get the perfect shot can all amount to nothing if you take just a single shot. Why? A pic might look good on the camera’s screen to only reveal bad elements when it’s later blown up on a larger screen.
So, if you are asking, how can I improve my skills at taking feet pictures? Take as many pics and have patience!
Make every pose count by taking several shots of the same pose. Later, you can choose the best pics for publishing. This beats having to edit each and every pic for the desired effect.
The same goes for feet video: take footage that is longer than required. During video editing, you might find interesting footage that you dint know you needed.
7. Understand ISO Controls
Without going into technical details, in photography, ISO refers to a camera’s sensitivity to light.
Low ISO settings (200 and below) are best for outdoor photoshoots while higher settings (above 400) are ideal when shooting in low lighting conditions; such as at night, indoors, or during a cloudy day. Use the settings accordingly.
8. Adjust White Balance
When exploring the different settings on your camera, you’ll come across settings such as Daylight, Flash, Fluorescent, and Shade. The features refer to color adjustments that can make your photos appear more of one color or the other.
As an amateur, start by using the Automatic White Balance option before trying out the other features.
9. Choose the Best Feet Pics
When listing your feet pics on stock photography sites, it helps to have a huge gallery.
However, to get exclusive followers on sites such as Instagram, you need to only list your best pics.
10. Focus On Your Feet
It goes without saying that if your aim is to sell feet pics then, concentrate on taking feet pics!
Yes, your legs might have perfect hips and long legs, but people who search for “feet pics” are not interested in any of that: If it’s feet, keep your focus on your feet!
How to Edit Your Feet Pictures?
Post-production is an important step to ensure that your clients get their money’s worth.
Editing also helps you to remove unwanted elements in a photo and improve the overall aesthetics of an image. Some basic photo editing do’s include:
1. Crop your images
Remove the unwanted edges and focus on your feet to take a larger portion of the frame.
2. Apply filters for unique looks
Notice how your image changes automatically and see whichever filters you like the best.
3. Do color correction & Adjust the white balance:
Adjust the contrast, saturation, and vibrance levels to make your photos look more professional.
How to Take Feet Pictures: FAQs
1. What Do I Need to Start Taking Feet Pictures?
All you need is your beautiful-looking feet and a phone to start taking feet pictures. But, investing in a camera, tripod, and proper lighting gear can go a long way and make your feet pictures more professional.
2. What Should I Wear in My Feet Pictures?
You can wear any of these items on the list, for example, socks, ballerina shoes, stockings, heels, jewelry, etc to grab attention for your feet pictures.
3. What Type of Camera Should I Use to Take Feet Pictures?
Any high-quality point-and-shoot Canon or Nikon DSLRs camera with a closeup lens is best for taking feet pictures with impressive quality and resolution.
To simplify the selection process you can check this out: The Canon PowerShot G7 X Mark III+ Accessory Bundle
How to Take the Best Feet Pictures: Conclusion
Taking the perfect picture can be an uphill task, especially for an amateur.
With the right photography equipment, however, you can take cute pics to pad your online image gallery. When working on a small budget, you can also get started by using a smartphone with quality camera settings.
Once you have your feet pics ready, the next step is knowing where to sell your collection, read on to find out which apps sell feet pics.
Have you tried selling feet images? How was the experience? Share your thoughts with other feet lovers below.

Howdy Folks, thanks for stopping by my blog.
I’m Swati, a proud mom, dedicated side hustler, full-time blogger, and a recognized millennial work-at-home expert. My expertise has been featured on esteemed platforms such as Forbes, CEO Blog Nation, Referral Rock, Vital Dollar, Databox blog, and many more. I have embarked on this incredible journey to share my firsthand experiences in the world of online income generation and to assist all of you in earning money from the comfort of your homes.
Join me in my mission to revolutionize the way we make money and achieve financial freedom. Trust me, it’s not as challenging as it may seem!
Together, let’s explore the boundless opportunities and pave our paths towards a prosperous future.