Disclaimer: I am an affiliate of Bluehost, so I will receive a commission if you sign up through my referral link, at no additional cost to you.
We live in a time when a single job just isn’t enough. It’s not just stay-at-home moms, students, or retired seniors who want a job opportunity to keep themselves occupied. I know fully employed people looking for work from home, as an additional source of income.
Now, in this modern age of the internet, it is not difficult to find something that many small business ideas investors can put their money into. Thankfully, you can do thorough research easily to compare and find the least investment opportunity.
Blogging is one such low investment idea that you can start for less than $100! It is that which changed my life and allowed me to make thousands of dollars a month, all by doing something that I love.
Do your research, you’ll be shocked to notice bloggers making money in millions. Obviously, you’d want to have your own well-paying blog. And, I second that. I have been there too. So, do you want to earn a full-time passive income while staying at home?
I bet you are and that’s the reason you are here today.
Am… I right?
Now that, you want to start a blog and turn it into a profitable business. Here’s a little heads up – blogging is a marathon and not a sprint.
Above all, it’s a perfect example of endurance and hard work. If you’re expecting overnight results, I suggest ‘beware blogging’. Yes, you read me right! I don’t want to mislead you with false promises.
Here’s what makes me say so…
Back in Jan 2016, I was a busy MOM working on a full-time day job! I desperately wanted freedom from my daily 9 to 5 grind.
As a matter of fact, I believe that every individual should enjoy personal & financial freedom while doing what they love!
That’s exactly why I decided to ‘START A BLOG’ and turn it into a full-time career (fingers-crossed). Thanks to my boss, for his unintended motivation 😉
Blogging isn’t easy, actually, it’s a tough row to hoe.
There were several occasions when I lost hope and decided to give up blogging. But, my passion to turn into a successful solopreneur, won me over. This motivated me, in turn, to guide blogging novices to generate passive income while staying at home.
It’s the best decision I’ve taken so far.
Within just 6 months of blogging (as a side-hustle), I officially started making money on my blog (not much though, just $62). But that number kept increasing day by day! And you know what? I’m glad that I finally went from making a ‘two-figure to a ‘4-figure’ monthly income – yes, it’s true!!
As of March 2021, I make over $6k a month – totally passive after counting in the expenses.
Insane isn’t it?
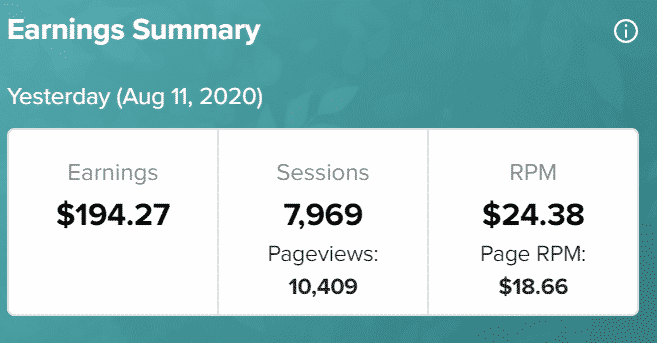
That’s a snapshot of my ad revenue for a single day!
Note: Keep in mind, that this doesn’t count in the money I earned through sponsorships, affiliate marketing, and other avenues. I currently make over 50k a year net income blogging from home.
So, folks, if I can start a blog, monetize my blog, & make money blogging, you can too! Stop worrying about your stressful day job and start making money side hustling as a blogger.
Trust me, it’s definitely possible to make a living from your blog – like I do!
But I would never suggest you quit your job until things actually materialize. This ultimate step-by-step guide will quickly walk you through setting up a professional blog. Firstly, let me start with a brief WordPress intro and then get into details.
The Ultimate Step-by-Step Guide to Start A Money Blog
WordPress.org allows for easy customization with unlimited add-ons, that help you run your blog more efficiently. It also helps you monetize your blog more effectively so that you can quickly start earning back your initial investment.
Fortunately, it’s super easy to set up a self-hosted WordPress site. It’s a paid version of the free WordPress blogging platform to attain creative freedom. By which, you get full control over your asset (blog), which is not possible with a free version.
This is not to say that the free version is not worthwhile for a beginner. It’s just that while you operate and populate your blog, technically speaking, you’re not the owner of the site; WordPress owns it.
Why should owning your blog concern you? It all has to do with what you can do with your creation. If you own it, you can sell a blog at up to 25-30 times the monthly income it brings.
That’s to say, I could have sold my blog for up to $50,000 ($2K X 25), approximately, a year after launching the blog.
To have such fast money-making options you need to set up hosting.
So, stay calm and follow the steps shown below. I bet the entire setup (registration + installation) will take no more than 15-20 minutes. Easy-peasy!
#1: Choose Your Niche
But, since you have already read this far, I am sure that your goal is to earn from the blog.
So, make sure that you pick a topic that is not only of interest to you personally, but is also relevant to others. That does not mean you pick something common, even though you are not interested in it.
The idea is to speak about your own area of expertise to a group of people who are interested to hear from you.
Your NICHE should be an intersection of your passions and interests, audience requirement (what people need help with), and your core skill set.
Get to know the basic principles of niche selection right here.
#2: Name Your Blog
For you to understand some of these tech names better, imagine that the internet is a large community: “Hosting” is the house where your blog resides with a unique address known as the “Domain”.
So, a domain name is the name of your blog. For example, this blog’s domain name is hearmefolks.com got it?
This is the next big thing you need to brainstorm; the domain name you choose totally depends on the niche you select. A brandable, memorable, and precise domain is highly preferable.
You can also choose to name it after yourself to build a strong brand presence with your voice. However, I suggest you do some research and make sure that you ‘choose a domain name’ that’s perfect for your brand!
The best blog name needs your thought and a sense of purpose, besides your creativity. As I mentioned above, the niche of the blog is extremely important. Now, It’s a good idea to choose a blog name that reveals the domain, so that people are not confused.
Next, think of the purpose of the blog.
What message do you want to send?
Try to incorporate your purpose in a single word. Create a list of names that are short, unique, and easy to remember. Then, you can speak to several people. Once you find the name that’s most popular among these people, you’re good to go.
Here is a quick checklist of what a good domain name entails:
- Avoid dashes and other forms of punctuations
- Make the name as short as possible
- Be unique, avoid riding on someone else’s brand. hearyoufolks.com? Bad move!
- Go for a name that’s in line with your blog’s main topic. For instance, if it’s a beauty blog, a name such as ‘Skinfresh.com’ will do!
Once you select a name, head over to see if your desired domain name (or vanity URL) is still available for registration.
#3: Purchase Domain Name & Hosting
Now that you have your name, it’s time to buy a domain name with the right extension, i.e. .com, .net, .org, etc. Here is how to go about the purchase:
In the Bluehost ‘create a domain name‘ bar, enter your chosen domain name and ‘check for availability. (For our example, I have chosen the name “miewako”. It’s a made-up name, so don’t read much into it.)
If available, you can proceed to the next step. If not, you’ll be notified that your preferred domain is taken, and you’ll have to repeat this step until you find one that’s ready to register.
Once you are ready with the domain name, you can proceed to website hosting. It is the server for storing everything you post on your blog, and for everyone to see.
To put it in simple words, a web hosting provider is a company that’s responsible for putting your blog up on the net so that everyone can see it, and for storing your blog files.
From here on, there are two options to go about:
Free Vs Paid Hosting
Now, if you choose to go for free hosting, then you will have to face many limitations when it comes to ownership, customization, and monetization of the website. I wouldn’t want you to start for free unless you are a hobby blogger.
If you’re passionate about blogging and want to make money off it, you’ll need to avoid taking that path at any cost.
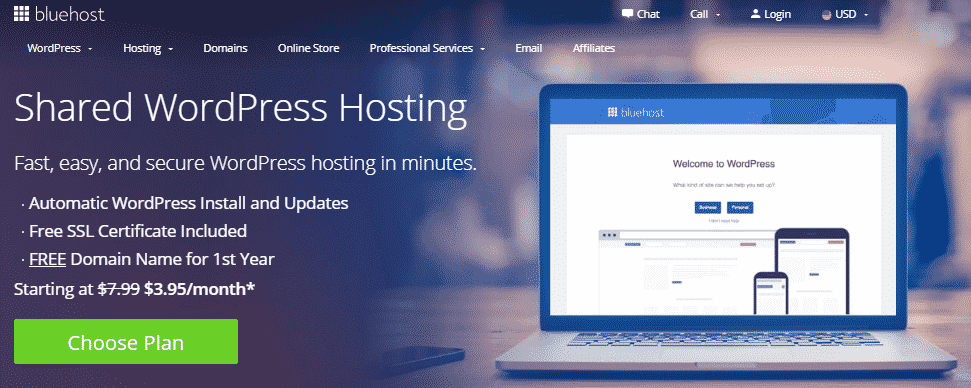
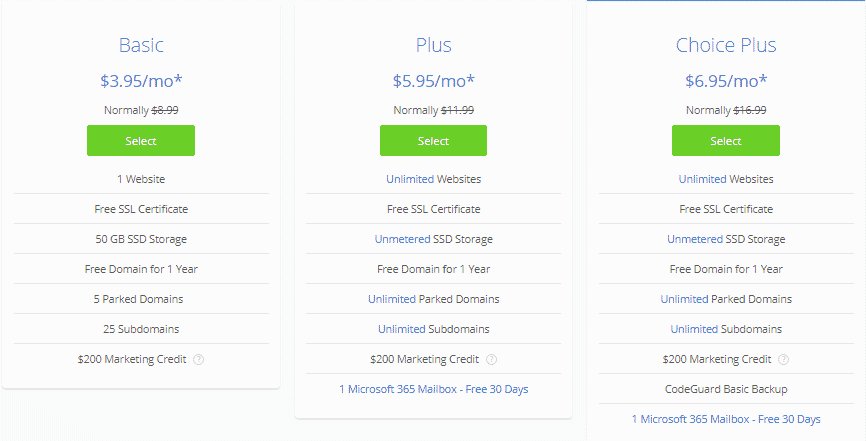
Since you’re just starting, I highly recommend you get started with Bluehost – “Basic Shared Hosting Package”, for just $3.95/month (you also get a FREE domain name worth $15). Even If your budget is modest, implementing this shouldn’t stop you from starting a money-making blog.
With Bluehost, you will be able to save a lot of money!
Bluehost offers free domain and website hosting prices at an unbeatable price, unlike its competitors. Also, you’ll be saving time & unwanted hassles by purchasing both services at the same time from the same provider.
This is especially beneficial to beginner bloggers, who are still learning the ropes.
Ready to set up a world-class blog right today? Get started on Bluehost now and follow this tutorial:
1) Navigate to Bluehost and click ‘Sign-Up’
On a separate tab, open Bluehost.com which will take you to the homepage shown below.

2) On the top-left corner rest your mouse on “WordPress”, drop down and click on “WordPress Hosting”.
3) The action will take you to the below page, prompting you to choose your plan. Tap on “Choose Plan” or scroll down to view the different WP hosting plans.
As a beginner, go for the “Basic” plan. This package covers all the features needed to get your site off the ground. As you advance, you can upgrade to the other plans.
4) Next, tap “Select” in the “Basic” plan to be redirected to the page where you will enter the domain name from Step 3 above. Enter the name on “Use a domain you own” and click “Next” to create your account.
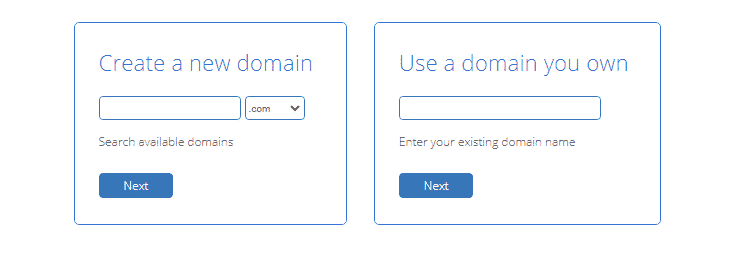
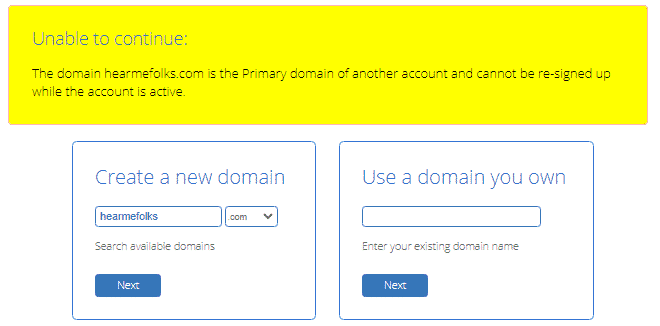
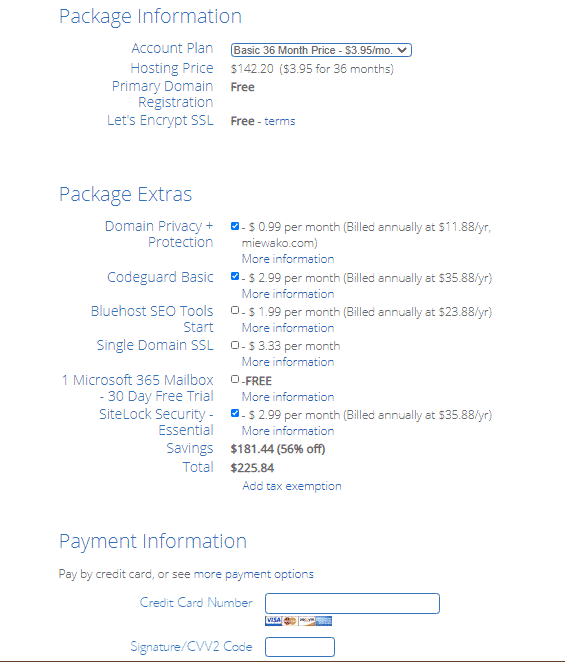
6) Here, proceed to fill in the required account information, starting with personal details. It’s also on this page where you choose the different “Package extras” such as privacy + protection, and SEO tools.
Important Tips:
- Keep an eye on the “Total” section to see how each box that you check/uncheck affects the overall cost.
- For a new blog, I recommend going for the very basic features. With this in mind, you only need to check “Domain Privacy + Protection” and uncheck the rest. That’s optional too. When I started blogging, I just paid for the hosting without any add-ons!
- Pay for the 36 monthly “Account plan” which is cheap in the long run.
- Since you are to provide your account payment details at the end, avoid filling this part in public; you could fall for online payment scams.
Once you are done filling out all the required fields, scroll down and press submit. You will get a screen notification that your purchase is approved with an email affirming the same sent to your address.
7) On the new screen, click on “Create Account” where you, basically, create your Bluehost account password. Note down the password since you will be using it to access your blog going forward.
8) You’ll then be redirected to log in to your Bluehost account. Enter your domain name and password, to get to the Bluehost Control Panel like the one shown below.
#4: Pick Your Theme
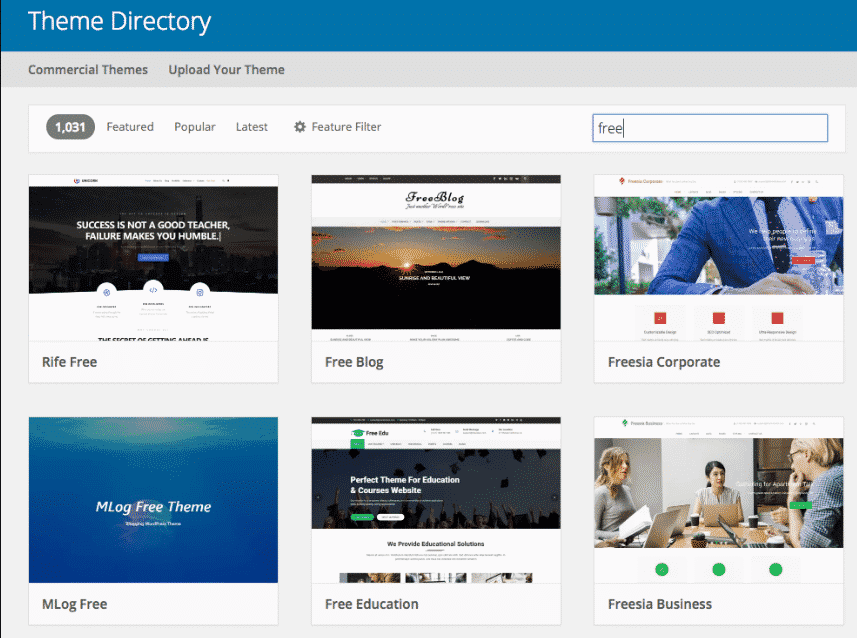
One of the reasons why I like Bluehost is that the account comes with 1-click WordPress Installation. So, once you’re done setting up your Bluehost account, WordPress is automatically installed on the account. Not just WordPress, but the latest version of this amazing blog builder.
To get started on the building process, you have to first choose a theme that is perfect for your site. Themes are the designs used to display on the front end of your blog/website.
WordPress is equipped with thousands of FREE THEMES to save time & money!
Simply, Navigate to Appearance << Themes Tab on the left side of your WordPress Dashboard to access unlimited themes. Once you found the one that appeals to your eyes, click “Install”, and then “Activate” to switch to the new theme.
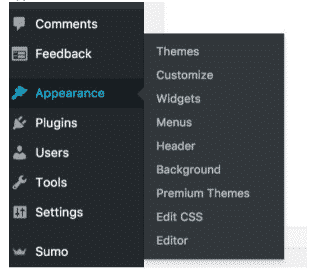
In the beginning, you might want to start with a free theme, which is advisable when working with a string budget.
Lack of widget areas and customization options, site speed, and security concerns are a few issues that come with free themes. So, I suggest you upgrade to a premium theme and make your blog brandable with a custom-designed theme of your choice.
My #1 recommendation would be GeneratePress themes as it’s lightweight, cheap yet professional, and very beginner-friendly.
#5: Install WP Plugins
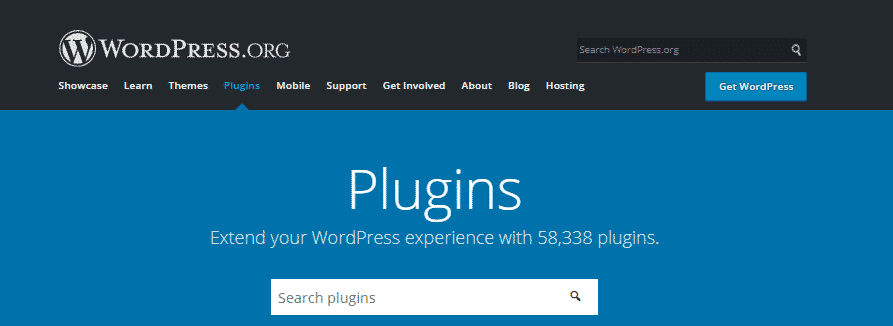
Now it’s time for plugins. What are plugins, you ask?
Well, they are bunches of tools to give additional benefits and features to your blog. From Search Engine Optimization to recording the statistics of your site and its posts – everything can be at your fingertips with the help of plugins.
Don’t get greedy, though. Some bloggers tend to overload their sites with plugins. This can actually cause several problems. Sometimes, when the plugins get updated, they may have bugs; when you have too many plugins, you won’t be able to figure out which plugin is causing the problem. In addition, they can cause security problems, too.
Here is a list of 5 most popular and helpful plugins:
- Yoast SEO – As you can understand from the name, this one helps to improve your site’s content and optimize it for search engines.
- Jetpack – It is an excellent plugin for you to analyze the stats of the posts on your site, as well as for the security, backups, etc.
- Akismet – This is applicable for almost every site, as it helps to filter out all spam comments – something that every blogger.
- WP Super Cache – This one helps to speed up your site and help it to run more efficiently, while code executions and database queries continue in the background.
- WPSmush – This plugin helps compress the image size and enhance the site speed.
There are over 58K+ WordPress plugins to choose from. Look at the ratings and reviews to know which plugin works as it’s billed. Due diligence will ensure that your site is not slowed down by bugs and too many updates, now and then.
How to Add a Plugin on WordPress:

Click the “Add New” link that shows after you tap on the “Plugins” tab on your WP dashboard menu. This will take you to the page above from where you can search plugins based on functionality, popularity, and so on.
Once you get the plugin, tap on its “Install Now” button, wait for it to download, then click on “Activate”. This will automatically incorporate your plugin and add it to the “Installed Plugins” page- navigate to Plugins << Installed Plugins to view it.
#6: Start Publishing Content
After applying your preferred theme, all you have to do is, launch your blog.
The domain name, check!
Hosting, check!
WordPress interface, check!
WordPress Theme, check!
Hoopla!
As you can see, starting a blog today is as simple, easy, and fast as setting up a social media profile. Anyone can start a blog and that’s what this post is all about. And now that you’re done with your WordPress Installation, I cordially invite you to the world of blogging!
You can now jump-start blogging to publish the first post on your own self-hosted WordPress blog.
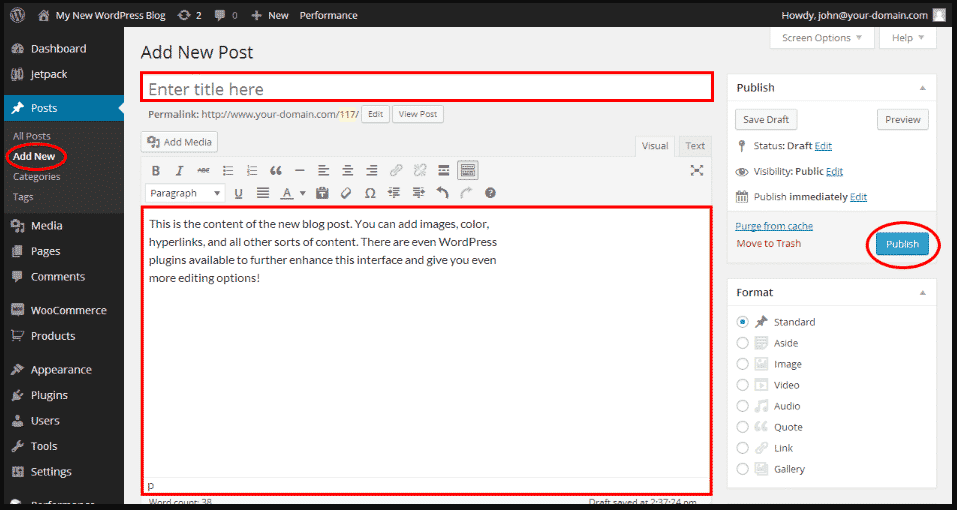
Content is the driving force for your blog.
A well-crafted blog post will definitely win the heart of your readers. What if, it additionally solves a problem your audience is facing.
You must try to provide value to your audience. A value that provides a solution to their problems.
Pro Tip: Reddit, Quora, and niche forums can be a gold mine for your blog post ideas. Utilize them to a maximum and look for popular discussions relevant to your niche.
Frequently Asked Questions:
1. How many posts and pages should you launch your blog with?
There is no fixed answer to this, and that’s totally up to you.
It’s good to go live with at least 3-5 CORNERSTONE articles (at least each per category) with a minimum of 1500 words, the more the better!
These are the type of posts that will drive traffic to your site long after they have been published. They also play an important role in telling your audience the type of content you produce and what your brand and values stand for.
Whatever your schedule is, make sure you are regular. I recommend you start posting with a goal of at least once a week, and once that’s sustainable for you (~6 months), up it to twice a week. It will help your page views and social media if you get more content out.
Now coming to the important pages on the blog. You need an About, Privacy Policy, and a Contact page at the minimum.
Once you start making money, you need to add your ‘Disclosure’ policy, and an ‘Affiliate Policy’ page the moment you start marketing your own products. Likewise, if you’re planning to offer services, the Terms & Conditions page is a must!
2. How to drive traffic to a new blog?
Promote vastly!
The major struggle of blogging lies in driving traffic to a blog.
Starting was really hard for me; I had no idea how those big blogs started. I struggled with traffic like any newbie. There weren’t any mentors around to teach or guide me through everything.
It was even harder because I had other things to work on. I took my time to examine the patterns and observe what other bloggers did.
If your blog isn’t showing any signs of traffic, then you need to put in some extra effort. Pinterest has been great for many bloggers, and it can do wonders for you as well (even though you just started).
Check out this amazing course, that can help you uncover the secrets to driving consistent traffic from Pinterest.
Click here to Order Your Copy Right Now>>
If you’re looking for more, this Blogging Bundle includes six bonuses. Here’s a quick glimpse of what you get:
- A Detailed List of all the Digital Products you can create and sell on your Blog!
- Christmas Marketing Tips for Bloggers to Increase Holiday Traffic
- A Workbook that will help you identify your Ideal Reader Profile!
- A Swipe File containing a variety of email templates that you can use to ask for backlinks, approach influencers for guest blogging, and more!
- 40+ pages of Case Studies of Women who have built Successful Online Businesses from scratch at home!
- A detailed guide to setting up Tripwires in your Blog to make money on Autopilot!
- A document containing a roundup of 50 Facebook Groups for Bloggers of any niche!
3. How to Make Money From Your Blog?
Here comes the interesting part 😉
If you want to make money blogging, then you definitely need to know, these 8 most promising blog monetization models. I’ve personally employed them on this blog, to start making money.
Of the eight, affiliate marketing has been my major source of income. If you’re not familiar with affiliate marketing – selling someone else’s products or services and getting paid a commission for them.
As I said earlier, I didn’t start making money from Day#1 (not even in the first month). In the first few months, I’ve made just a few cents from advertising.
My main area of interest was always in affiliate marketing. It didn’t take much time for me to realize that affiliate marketing is not just posting links and making passive income. One needs to employ effective promotional strategies to make money.
It took a while for me to hone my affiliate marketing skills. I credit my success to this no-fluff affiliate marketing course for paving the way to success. After the successful implementation of the tips and strategies illustrated in these books, I started making around $1k a month (200% in just 3 months).
Fast forward 6 years, I make over $6k a month from home (take home $50000 per year). Increase your conversions and overall income with value-loaded content and affiliate links.
If you’re planning to get into affiliate marketing, I would definitely recommend you take her course.
There are several other ways to make money off your blog, but advertising and affiliate marketing are the easiest sources of passive income.
Click here to Skyrocket Your Affiliate Income
Winding Up
Hope these tips helped you to create your own profitable blog on Bluehost. I wish you luck with your blogging adventures. Be sure to visit my resources page for money-saving blogging tools and resources.
Comment below, let me know what you think and feel free to share your own success story.

Howdy Folks, thanks for stopping by my blog.
I’m Swati, a proud mom, dedicated side hustler, full-time blogger, and a recognized millennial work-at-home expert. My expertise has been featured on esteemed platforms such as Forbes, CEO Blog Nation, Referral Rock, Vital Dollar, Databox blog, and many more. I have embarked on this incredible journey to share my firsthand experiences in the world of online income generation and to assist all of you in earning money from the comfort of your homes.
Join me in my mission to revolutionize the way we make money and achieve financial freedom. Trust me, it’s not as challenging as it may seem!
Together, let’s explore the boundless opportunities and pave our paths towards a prosperous future.


Kevin Racicot
Saturday 13th of June 2020
Hey Swati, you've really presented this topic in a short and acceptable manner & not like other so-called pro bloggers making 6000-8000 long post just for SEO.
Anyways, I got the point. By the way, I wanted to know how your ads change continuously, I'm here reading this post from the last 6 mins & till now, the sidebar ad has been changed almost 10 times.
I'm also an AdSense publisher but I don't know how this is happening. If possible, can you please let me know how I can get the similar feature.
By the way, I'm Kevin from TechStudio
Philip Verghese Ariel
Thursday 16th of May 2019
Hi Swati, its indeed a great joy to be here today, in fact, I am here via a roundup post in which you posted your experience. Nice to meet a like-minded person from my own place. You covered an in-depth guide in blogging. THough I am in blogging for a few years some of the things mentioned in are really new to me. There is a lot to pick from this post. I am bookmarking it for my further read. Keep writing and keep helping other fellow beings. Best Regards ~ Philip
Swati Chalumuri
Friday 17th of May 2019
Having you here, itself is a huge appreciation. I greatly admire your work. Thanks a lot for stopping by, Philip!
bestabo
Thursday 18th of April 2019
Hello, This is a great article, it is well explained, step by step, because these days being a blogger or having a blog is something very important so we can increase our shown in the "www" world. Thank u for sharing.
Varsha Rajput
Wednesday 10th of May 2017
Hi thanks for this useful article, actually I'm to start a new now I got it how to choose a profitable topic to write a blog.
Thanks ????
Edos Ubebe
Monday 13th of March 2017
Epic post with tons of analysis. Great work buddy.